Map and Compass Backcountry Basics
Share this Post
Escaping the crowds and adventuring into the depths of the backcountry beholds countless rewards during all seasons. Whether you’re searching for a choice basecamp, untouched lines, or new routes with unique objectives, the backcountry is all about getting out and getting the f*** away. To do so, carrying a map and compass is necessary for backcountry explorers. But it’s not enough to just carry these items… Without knowing how to use them, they are as useless as if you left them in the car. Whether this info is brand new to you, or you’re looking to reacquaint yourself with the skills, let’s go over a few map and compass backcountry basics.
READING A MAP
I may be a bit of a geography geek, but maps are friggin’ awesome – they’re a 2-D way to illustrate a 3-D world! At first, all the squiggle lines may seem daunting but once you understand basic concepts, the world will soon be your skiing oyster.
SCALE: For starters, we want to check the scale of our maps. This is key for backcountry travel because when 1 inch equals 1 mile on a certain map scale, 1 inch can equal 10 miles on another map scale. Neither you nor your partner will be happy with that route if you weren’t prepared for it. So what is the map scale for your planned adventure region? There should be a scale somewhere on your map that looks something like 1:24000, which means one inch equals 24,000 inches in reality. A large scale, such as 1:50000 means the map covers a vaster area and probably contains less detail. There should also be a representative scale to help visualize real-world distances. Using the edge of your compass, you can obtain rough estimates about hiking distances based on the maps’ scale.
CONTOUR LINES: These are the fingerprint-looking squiggle lines on your topographical map. What a contour is trying to demonstrate is the 3D terrain in a 2D medium (i.e. paper.) The closer together the lines appear, the steeper the terrain. Contrarily, more spaced out lines signify more moderate terrain. Think of it like you were heliskiing and looking down at the towering points from above; what do they look like from this bird’s eye view? This is what the contour lines demonstrate.
Here is a great visual of the concept provided by REI:
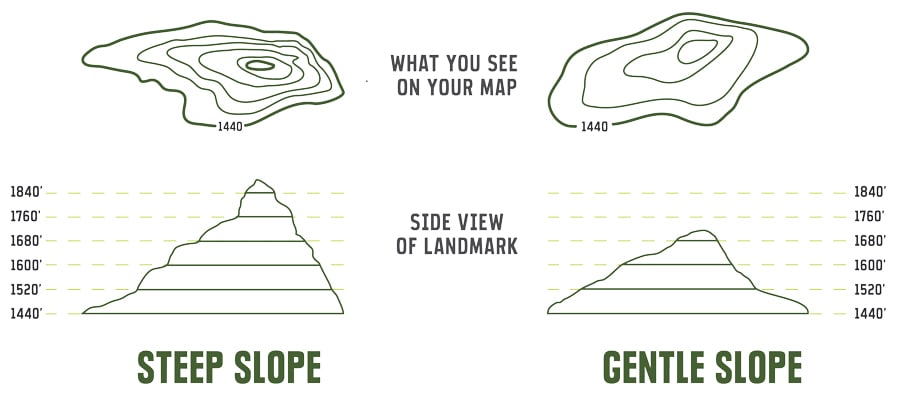
Visual contour concept provided by REI, steep vs gentle slopes topo.
While studying your map, you’ll likely see some contour lines are bolded with numbers. These are known as Index Contour Lines. An Index Contour Line occurs every fifth line and provides elevation readings. The change in elevation from one contour line to the next will be consistent within the same map. Most maps will have either a 40-or-80-foot contour interval. For example, if your map has an 80-foot interval, between each contour line there are 80 vertical feet between the next closest line. Your map legend should list the contour interval.
If you see contour lines with little tick markers around them, check the elevation numbers. Most likely, this is a depression.
Blue lines indicate water, such as rivers, streams or lakes. However, maps do not reflect seasonal change. Thus, there is always a chance those streams or creeks can be dried up depending on the time of year you’re adventuring.
In addition to contour lines, take a moment to familiarize yourself with your maps’ legend. Each map will use unique icons to communicate important features. Some common icons are campsite locations, bathrooms, trailheads, and ranger stations. Knowing what amenities are around and available comes in handy when planning an adventure. Where are you sleeping? Where is a water source? Where is the nearest exit in case of emergency? All these answers can be found with a detailed map.
To practice identifying geographical features, from peaks to ridgelines, open meadows to deep valleys, I suggest practicing in a familiar area. Buy a map, go somewhere you know well and look at how the region is reflected on the map. Now, let’s talk about the next piece of our puzzle – the compass!
COMPASS ANATOMY
Thank goodness for REI’s graphic design wizards, because I doubt I could create this visual to help with explaining the anatomy. Thank you, REI! The image below helps to easily identify various parts of the compass:
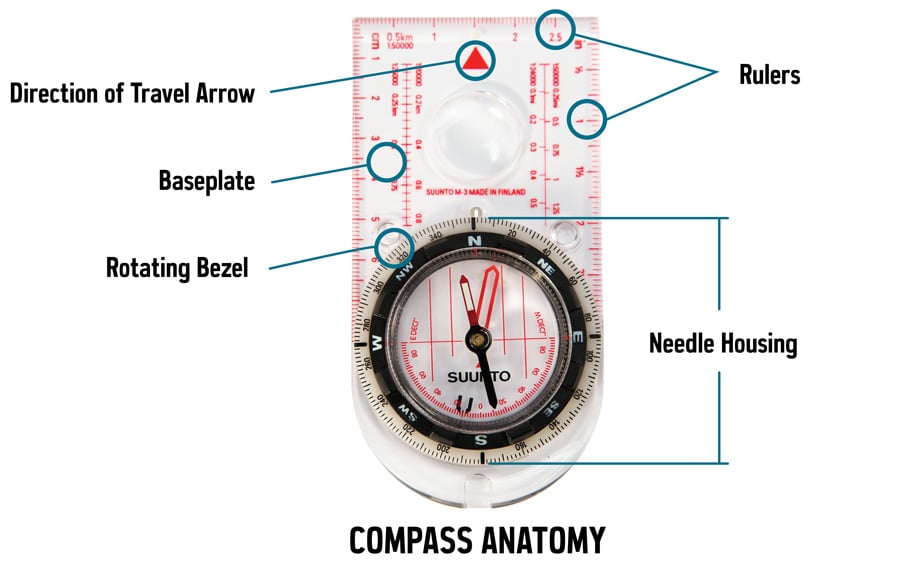
REI compass anatomy basics.
RULERS: Along the sides, are rulers in various measurement units. These are useful for translating scale on a map to the actual distance of the route.
DIRECTION OF TRAVEL ARROW: This small arrow is critical for taking and following bearings. Make sure it is always pointing in the direction of travel, both on and off the map.
BASEPLATE: The clear, plastic body of your compass. It is clear so that you can see the details of your map below and has at least one straight edge for taking and marking bearings.
ROTATING BEZEL: Also known as the “azimuth ring,” this rotating dial is marked with 360-degrees. A quick cheat is 0 = North, 90 = East, 180 = South, and 270 = West.
Now, let’s focus specifically on what’s going on near and inside the rotating bezel:
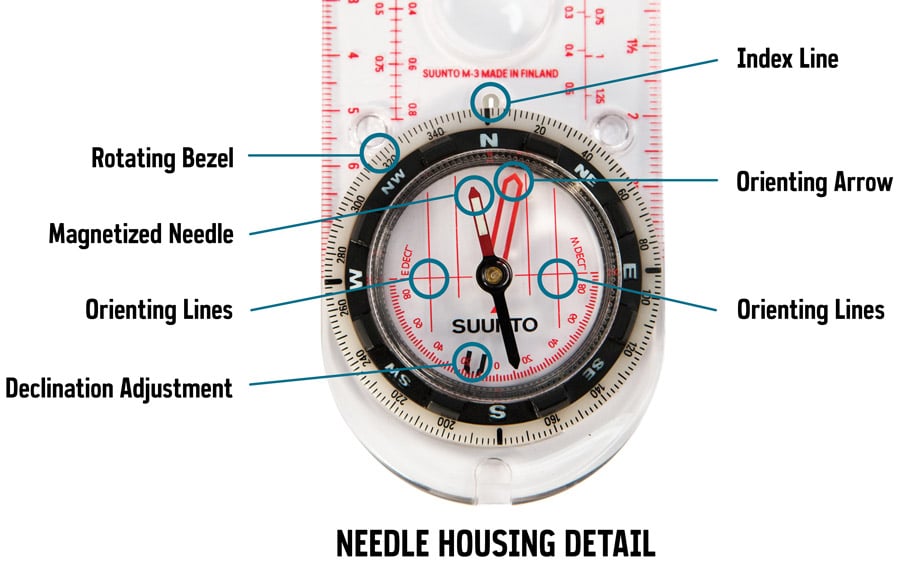
REI compass anatomy needle housing details.
INDEX LINE: Located directly above the bezel, this is also called a “red bearing here” mark. This marker is useful for reading a bearing.
ORIENTING ARROW: Also referred to as “the Shed,” this outline is used to orient the bezel. The shape exactly fits the magnetized needle.
MAGNETIZED NEEDLE: The end of the arrow that points to the magnetic pole and is usually red or red-and-white. You may hear me later refer to his as “Red Fred”
ORIENTING LINES: These parallel lines rotate with the bezel. When correctly aligned with the north-south lines on a map, it also aligns the orienting arrow with north. Pro tip: pay attention that north on your bezel is pointing to north on your map when lining everything up!
DECLINATION ADJUSTMENT: If your compass doesn’t have the option to adjust declination, you can compensate for the difference between true north versus magnetic north using a few extra steps outlined in this REI blog.
TRUE NORTH VS MAGNETIC NORTH
So reading that last part of the compass anatomy, you may be thinking “Wait, what the hell is declination anyways?” Glad you asked! But, be warned, I’m no scientist so my definition may not be super in-depth. Basically, declination is the degree of difference between True North and Magnetic North based upon your geographical location. As you change location from east to west, so does your declination. This is because what we think of as the top of the globe is our “true north.” However, where your compass’ magnetized needle points is a result of the Earth’s magnetic fields and its core elements. These fluctuate in complicated ways and ultimately create a “magnetic north.” Fortunately, most modern maps have calculated declinations easily identified in the legend. You should see a black arrow labeled TN (true north) and a separate arrow splitting off labeled MN (magnetic north). Whatever degree is listed between is your declination.
Keep in mind, magnetic north shifts throughout the years. Therefore, it is important to have a current map with an up-to-date declination degree. Sorry, no weathered pirate maps to buried treasure allowed! Once you know the declination of your region, you can adjust the declination on your map to easily navigate with accuracy. If you are unfamiliar with how to adjust the declination on your compass, do a quick Google search for a video tutorial of your specific compass brand.
PROPER COMPASS POSTURE
Fun fact: most compasses have liquid inside them. Thus, if you tilt the compass in any particular direction, it will slightly alter the direction in which the magnetized needle points. Therefore, it is important to practice proper compass posture! These are the basics:
- Stand straight.
- Hold compass flat! Do not tilt it towards you just so you can read it more easily.
- Treat the compass like it is an extension of your belly-button and move your body with the compass like it is a string pulling you.
It’s that easy! Boom – you’ve nailed compass posture! But hey, once you’re in the backcountry and the terrain gets a little more unpredictable, make sure you keep that baseplate nice and flat.
ORIENTING YOUR MAP
Now, it’s time to take your new map and compass backcountry basics mastery and combine them for ultimate backcountry navigation! These two go together like a pair of skis. To start, make sure your map is oriented with the landscape you’re looking at, (a.k.a. north on the map is aligned with true north in your physical space). As you become more versed in reading topography, you’ll also be able to identify recognizable features and orient based upon the geography. But until then, confirm your identification is correct. This is how to orient your map with your compass.
- Lay map on a flat surface.
- Set compass declination to the degree printed on the map.
- Place compass on the edge of map so that the direction of travel arrow is pointing towards the top of the map.
- Rotate the bezel so the N (north) is lined up with the direction of travel arrow
- Slide the baseplate until one of the straight edges aligns with either the left or right side of map while maintaining that the travel arrow points towards the top of the map.
- Lastly, while holding both the map and compass flat, slowly rotate your body until the end of the magnetic need is in the outline of the orienting arrow. Or, as I like to say, “put Red Fred in his Shed!”
Once your map is oriented, take a moment to practice identifying nearby landmarks. Take time not only to hone in on your topographical reading skills but to also familiarize yourself with your surroundings before venturing into the backcountry. And don’t be afraid to check in every so often to ensure you can still identify where in the world you are! As a mentor once told me, if you check-in every five minutes, you’re never more than five minutes lost.
TAKING A MAP BEARING WITH MAP AND COMPASS BACKCOUNTRY BASICS
It’s time to head off into the wilderness! But wait, where are you going? Well, that’s where taking a bearing comes in to help. A “bearing” is fancy navigation talk to describe a precise direction. For example, instead of saying “head southeast for 2 miles,” you might follow a bearing of 150 degrees for a more accurate angle of travel.
It is important to note that bearings are always relative to a specific location. Meaning if you get off your bearing, (because we are all human and walking a perfectly straight line is really hard,) you’ll have to take a new bearing and adjust for your new relative location. The same bearing from two different locations will not get you to the same destination.
Here is how to figure out your bearing when using a map and compass backcountry basics (a.k.a. I want to go from Point A to Point B):
- Align compass on the map so the straight side of the baseplate lines up between Point A and Point B.
- Make sure that the direction of travel arrow is pointing towards Point B. After all, this is the direction you will be traveling (i.e. from Point A to Point B.) If you forgot something at Camp A and were returning to retrieve it, then your direction of travel arrow would be facing the opposite direction.
- Now rotate the bezel until the orienting lines on the compass are lined-up with the north-south grid lines (or the left/right edge of your map) while making sure your north mark on the bezel is facing north on the map, not south.
- Guess what? Look at your index line – you just captured your bearing!
Now that you have your bearing, you are ready to begin following it to your destination. To do this, use your proper compass posture and rotate your body until “Fred is in His Shed” without touching your bezel marker with your newly discovered bearing. Once “Fred is in His Shed” and your direction of travel is pointing away from you, you’re ready to start walking (or skinning.)
TAKING A FIELD BEARING WITH MAP AND COMPASS BACKCOUNTRY BASICS
Taking a field bearing is a great way to help find your location on a map when you are uncertain or just to double-check and confirm. To do this:
- Start by finding a recognizable landmark that you can identify on your map.
- Then, use your proper compass posture to hold the baseplate flat with the direction of travel arrow pointing away from you and directly at the landmark.
- Slowly begin rotating the bezel until “Fred is in His Shed.”
- Once Fred is nice and cozy in his orienting arrow, look at the index line- you’ve recorded your field bearing!
Then, transfer your field bearing to your map to help indicate where in the world you are.
- Orient your map
- Lay your compass on the map and align one corner of the baseplate edge with the landmark.
- Check your direction of travel arrow (is it pointing towards your landmark?)
- Rotate the entire baseplate (don’t you dare touch that bezel!) until the orienting lines are running north/south and the north marker on the bezel is pointing to the north on the map.
- Now, once your orienting lines are parallel to the map lines, you can draw a line on the map from your landmark alongside the straight edge. The point where the line from the landmark and the trail cross is your location!
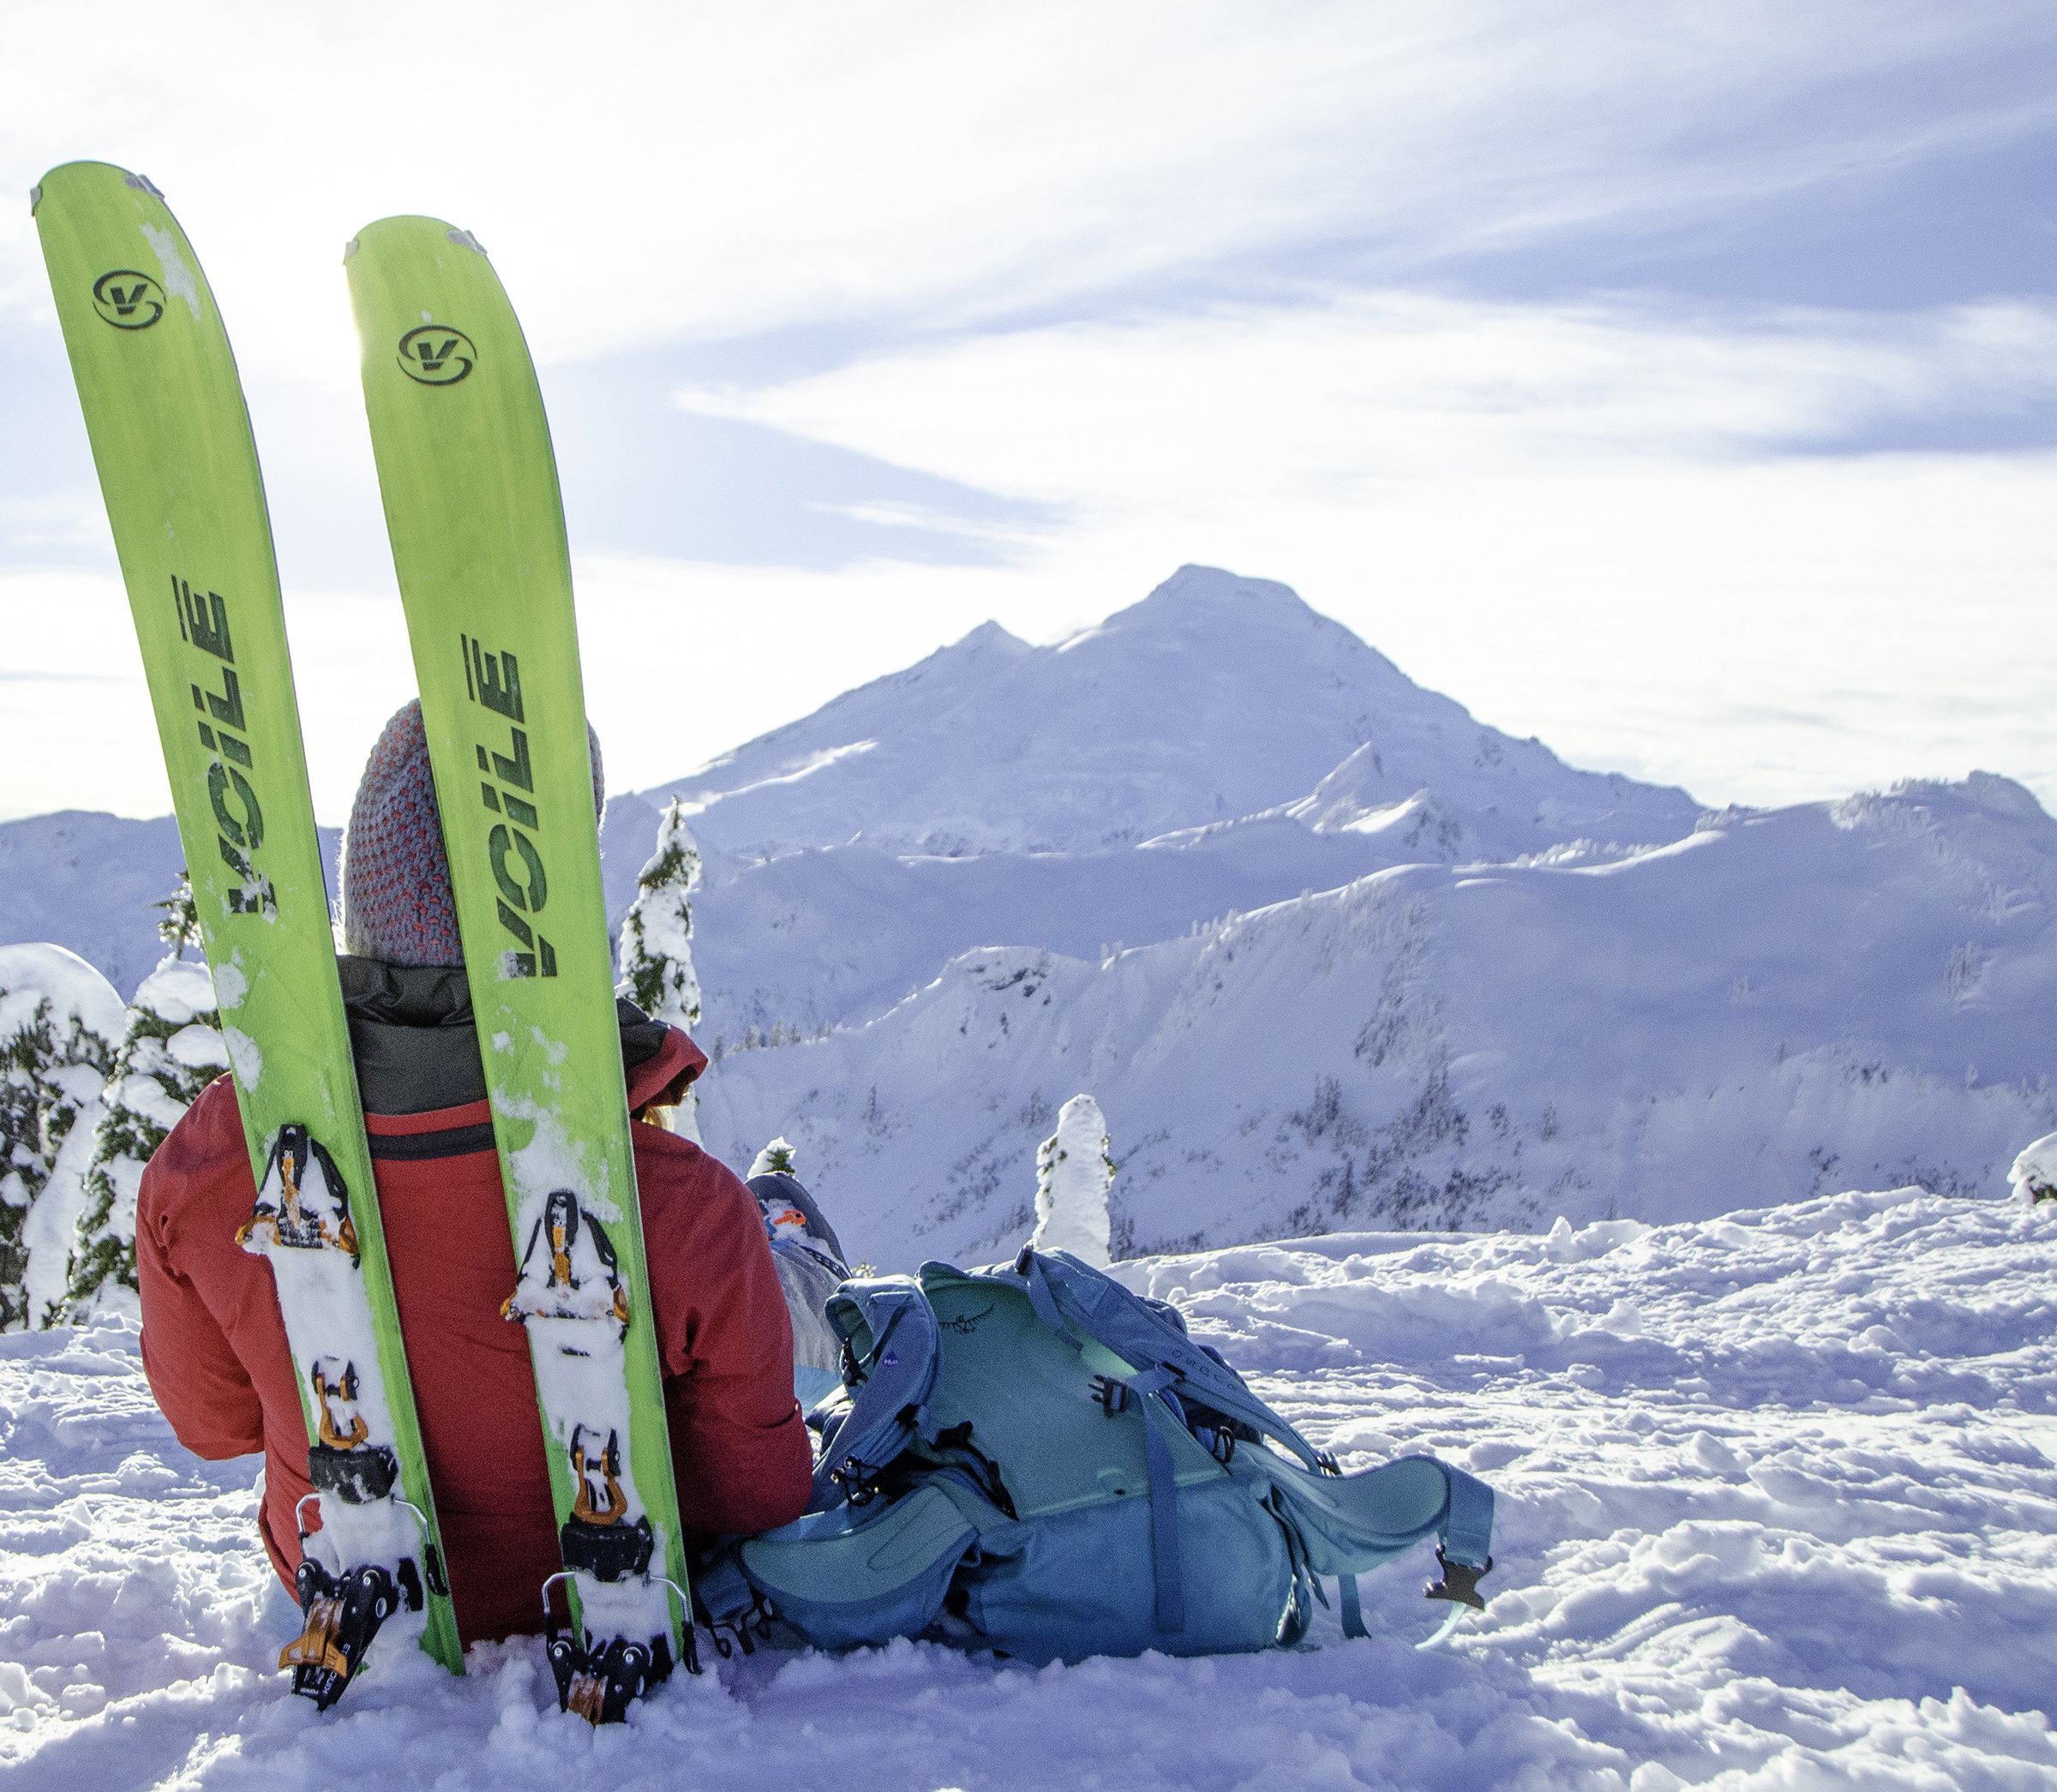
Brooke Jackson kicks back from navigating using a map and compass backcountry basics.
Now, I know what you might be thinking, “but Brooke, I’m a backcountry skier, I don’t use a trail!” I get it, which is why I’m going to introduce you to this next step of map and compass backcountry basics, you avid powder hound, you.
By using a technique called “Triangulation,” we can take multiple field bearings to help hone-in on our backcountry location. To triangulate, you normally need to take three separate field bearings that are at least 60-degrees away from each other. As you draw the lines from each bearing on your map, the lines should either intersect and you’ve pinpointed your location. Or, they will create a small triangle and your location will be somewhere in, or very near, that small area. If your lines do not intersect, or they create a large triangle, recheck your work. You most likely have a pretty significant error.
Now at the end of my navigation course, a common question is, “What next?”
What’s next is practice! The more you flex your navigational muscles, the stronger you will become at backcountry travel. To do this, you don’t have to go into full survival mode or abandon civilization. Start simple by buying a map to a familiar local park or wilderness area and just start practicing taking bearings or reading the topography of the recognizable landscape.
Happy adventuring!
Want to learn more about backcountry nagivation? Check out this blog post, Using Digital Terrain Tools to your Advantage by Inspired Summit Adventures.
About the Author

Location: Seattle, WA
Top Gear Picks: UltraVector 171cm / V8 176cm
Instagram: @wanderingtrailsmedia
Website: www.wanderingtrailsmedia.com
Brooke Jackson (she/her) is the founder of Wandering Trails Media, a media creation agency where she utilizes her storytelling skills to uplift the voices of others. Oftentimes, Brooke is behind the camera as a Photographer and Producer, yet is also known to scribble the occasion written feature. Outside of her professional endeavors, she is a volunteer with Olympic Mountain Rescue, as well as the Kitsap County Search Dogs with her Field Retriever, Eva.
Share this Post


